Showing posts with label manual. Show all posts
Showing posts with label manual. Show all posts
Wednesday, May 8, 2013
2013 Hyundai Santa Fe ix45 user manual
 user manual")
 user manual")
The 2013 Santa Fe is rumoured to be heading for a New York Auto Show debut in April, although Hyundai has yet to confirm plans on that front.
Sunday, May 5, 2013
Honda Rancher TRX 420 Winch Mounting Kit Installation Manual
PARTS LIST : Upper Mounting Bracket, Lower Mounting Bracket, Side Mounting Bracket, 8mm-1.25 x 30mm Bolt, 8mm Flat Washer, Spacer, 1/4-20 x 3/4" Bolt, 8mm-1.25 x 25mm Bolt, 8mm-1.25 Lock Nut.
TOOLS REQUIRED : Ratchet, Sockets: 10mm, 12mm, 13mm, 7/16, Wrenches: 10mm, 13mm, (2) 14mm, 3/8, 7/16, Screwdrivers: Slotted, Phillips, Allen Wrenches: 1/8, 5mm, Side cutters or Saw, Voltmeter or Test Light, Electric Tape.
TRX420 Installation Instructions :
1. Begin by removing the two plastic rivets on each side of the front plastic fascia, figure 1. Use a large screw driver to carefully remove the center rivet. After removing the center rivet, remove the rivet housing. Save the fasteners as they will be used to reinstall the front plastic fascia.
2. Remove the two side 6mm bolts securing the front fascia. Save the fasteners as they will be used later to reinstall the front fascia. Remove the front plastic fascia.
3. Remove the four 6mm bolts that secure the front skid plate. Save the fasteners as they will be reinstalled later.
4. Remove the two 6mm bolts that attach the front bumper to the plastic headlight assembly. Save the fasteners as they will be used to reinstall the front bumper.
5. Remove the two top 8mm bumper bolts that attach the front bumper to the front rack. Save the fasteners as they will be used to reinstall the front bumper.
6. Remove the four remaining bumper bolts that attach the bumper to the vehicle frame. Remove the bumper from the vehicle at this time.
7. Depress the side tabs and remove the plastic radiator panel from the vehicle. This panel will be reinstalled later.
8. Attach the winch to the lower mounting bracket (A2). Use the two 8mm-1.25 x 20mm bolts and lock washers supplied with the winch, and place a 8mm flat washer (B2) between each lock washer and the lower mounting bracket. Do not tighten the bolts at this time. Note: The end loop of the wire rope must be accessible from the top of the drum. If necessary, put the winch in free spool and rotate the drum so that the wire rope end is no longer underneath the bracket.
9. Place the winch and lower mounting bracket assembly into position in the front bumper.
10. Place front bumper and loosely positioned winch assembly back onto the vehicle frame. Reinstall the two top bumper bolts that were removed in step 5. Do not tighten at this time.
11. Place the upper mounting bracket (A1) onto the vehicle frame. Fasten the upper mounting bracket to the winch with two 8mm-1.25 x 20mm bolts and lock washers supplied with the winch. Place a provided 8mm flat washer (B2) between each lock washer and the upper mounting bracket. Do not tighten at this time.
12. Route the wire rope between the upper and lower mounting brackets (A1) & (A2), so that the end loop is visible from the front.
13. Install two of the supplied 8mm-1.25 x 30mm bolts (B1) and flat washers (B2) into the middle bumper mounting location. Place the supplied spacer (B3) into position between the ATV frame and the winch mounting bracket tab. Do not tighten at this time.
14. Install the supplied 8mm-1.25 x 30mm bolt (B1) and flat washer (B2) into the lower bumper mounting location. Make sure that the bolt passes through the hole on the lower mounting bracket (A2). Place the supplied 8mm lock nut (B6) on the end of the 8mm bolt (B1). Do not tighten at this time.
15. Place the side mounting bracket (A3) onto the bottom mounting bracket (A2) and install the two supplied 1/4-20 x 3/4" bolts (B4). Fasten the supplied 8mm-1.25 x 25mm bolt (B5) and flat washer (B2) through the side mounting bracket and bumper. Do not tighten at this time.
16. Place the motor terminal boots on the supplied yellow and blue electrical cables. Connect the yellow and blue cables to the motor terminals on the winch. Tighten the motor terminal nuts to the recommended torque of 5.7 N-m (50 lb-in). Slide the motor terminal boots over the motor terminals.
17. Position the winch on the brackets to maximize the clearance between the motor terminals and the adjacent bumper or frame members.
18. Tighten the four winch bolts to a recommended torque of 17 N-m (12 ft-lb). Remove the small tie bolt. This bolt should be retained for winch service. Reinstall the two 6mm bolts removed in step 4. Tighten the two 1/4" bolts, the six 8mm bumper bolts, and the two 6mm bolts to a recommended torque of: 6mm bolts- 12 N-m (9 ft-lb) 8mm bolts- 37 N-m (27 ft-lb) 1/4" bolts - 7 N-m (5 ft-lb)
18. Trim the plastic skid plate for winch clutch dial clearance. Skid plate should not touch the dial when the 6mm mount bolt is installed.
19. Install the roller fair lead using the two 10mm bolts, lock washers, and nuts supplied with the winch.
20. Reinstall the plastic radiator panel removed in step 7. Move the front plastic fascia into position over the roller fair lead. Reinstall the two side 6mm bolts removed in step 2 and the four 6mm skid plate bolts removed in step 3. Tighten the 6mm bolts to a recommended torque of 12 N-m (9 ft-lb). Reinstall the two plastic rivets removed in step 1.
21. Switch the winch clutch to free spool. Manually feed the winch cable through the roller fair lead. Attach the clevis hook, supplied with the winch, to the end cable loop. This is done by placing the winch wire loop between clevis pin tabs on hook. Insert clevis pin through clevis pin tabs and the winch wire loop. Insert cotter pin into clevis pin retaining hole.
22. Complete the winch installation as described in the winch installation and specification guide that came with the winch.
Tuesday, April 30, 2013
Mazda MX 5 Roadster Sport User Manual

Mazda showed the lightweight conception car - Superlight, built on the MX-5 equipage. This car is designed with European design partition of the visitant, supported in Oberursel, Deutschland. Idea shapely to celebrate the 20 day modelling MX-5/Miata. Execute of new conception planned for the global auto lead in City. Mazda Superlight unit is only 995 kg. Mazda Superlight prepared with a acceptable four-turbocharged engine of 1.8 liter power 126 hp, extremum force is isometrical to 166 Nm. Speedup 0-100 km / h in 9.2 seconds with the conception. Machine received 17-inch wheels with tires of dimension 205/45, Bilstein revolt absorbers and springs Eibach.
Monday, April 29, 2013
2012 Hummer H4 Manual

With GM making plans to discontinue the Hummer Brand Name and every automaker killing their SUV line up there is still a large amount of us that want more. According to J. D. Power and Associates, the Hummer brand captures and retains owners better than most, so its worth nurturing. The trick is making hugeness less of a calling card – a process that started with the demise of the H1 – but preserving extreme off-road ability. 2012 hummer h4 As anyone who has done any serious off-roading can attest, size is your enemy on the trail, so a smaller but still off-road-ready Hummer, perhaps like the HX concept makes perfect sense.
The HX gives us a good look at the upcoming H4, and if that new entry has all the off-road gear of the show car, itll be a strong addition to the lineup. The HX sports full-time four-wheel drive with locking front and rear differentials, 35-inch tires, a 3.6-liter direct-injected V-6, and an electronically disconnectable front antiroll bar – not to mention that unmistakable blocky styling. I think it will be a big hit not just in the U.S. market.
2011 Tesla Roadster Sport 2 5 User Manual
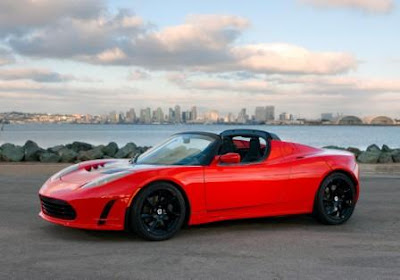
Discoverer Carriage 2.5 advance modelling, introduced at the Goodwood Fete. Galvanizing sports car Tesla Carriage 2.5 is priced from 101.500USD.The Inventor Motorcar arguably has had a important part in stoking public wonder in galvanic vehicles-and in effort enthusiasts mad near them. Time the display returns...
Subscribe to:
Posts (Atom)