Showing posts with label in. Show all posts
Showing posts with label in. Show all posts
Friday, May 3, 2013
Mazda launched new Flairwagon in Japan
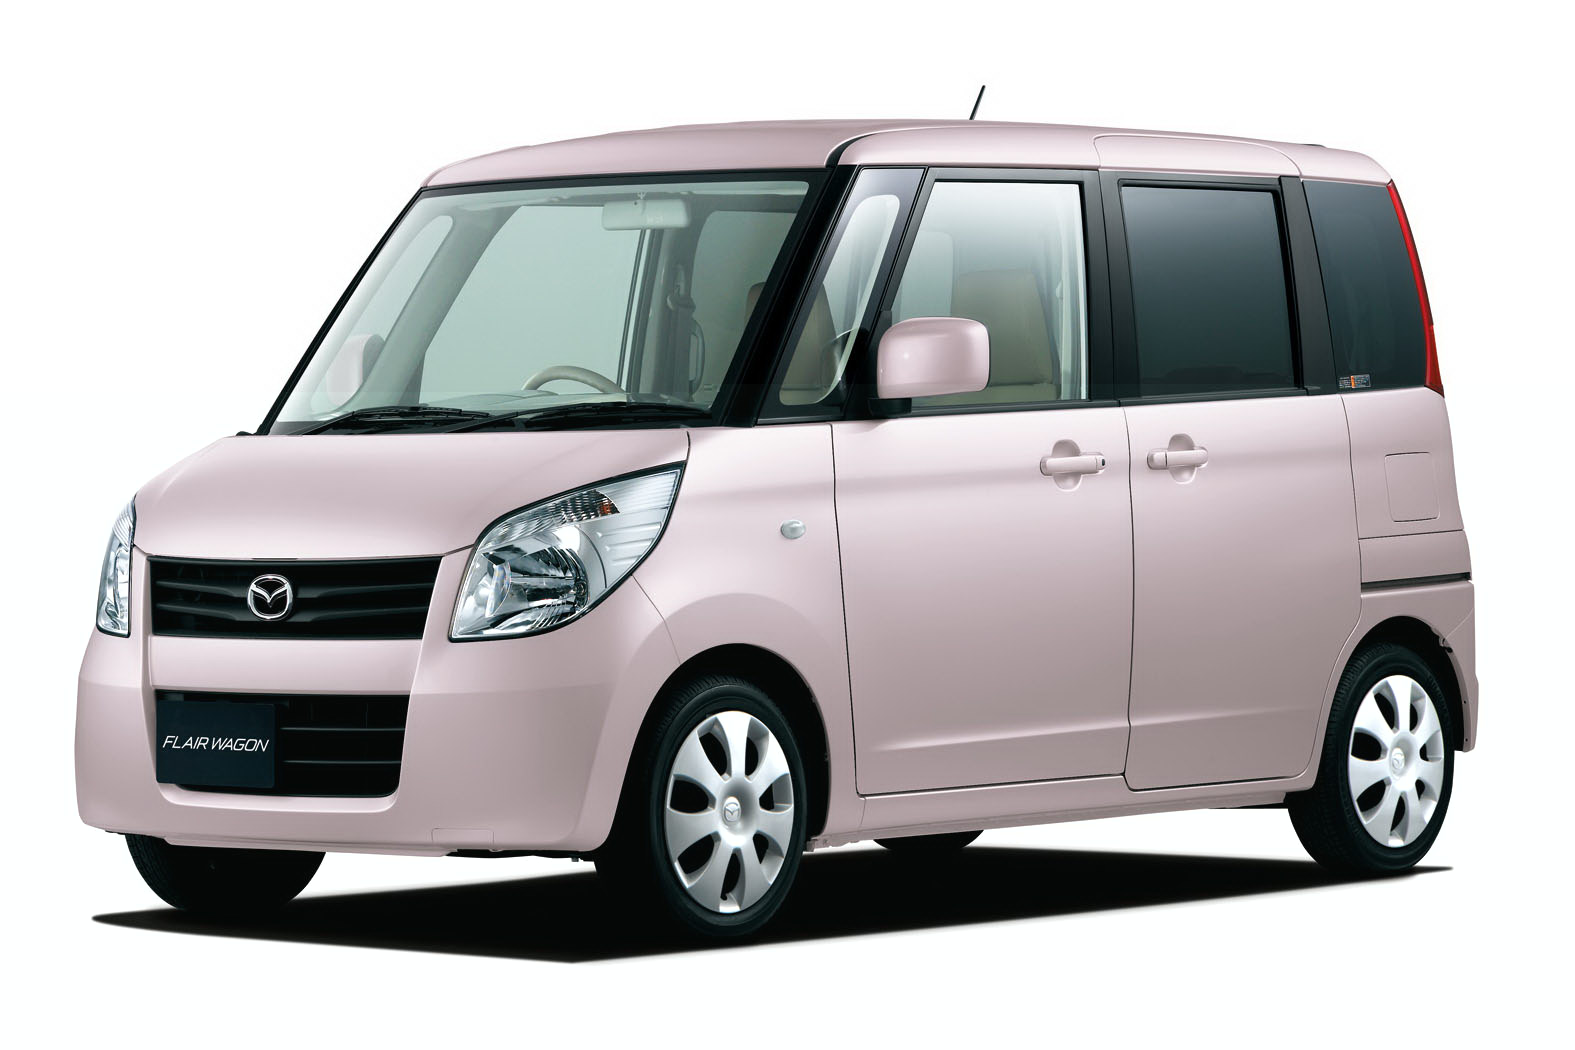
Mazda has added a new micro-mini tall wagon to its lineup in Japan with the release of the Mazda Flairwagon. It’s essentially a rebadged Suzuki Palette, and the vehicle is also rebadged by Nissan as the Roox.
The cabin of the Flairwagon measures 1,365 mm (53.74 in) high and 2,070 mm (81.49 in) long, with the luggage compartment just 535 mm (21.06 in) off the ground for easy loading and unloading. Mazda says the split-dive down rear seat can be folded almost flat to create enough room for a 27-inch bike. There’s also a passenger side under-seat box and an upper glove box that uses air from the air conditioner to function as a cold storage space.
Three variations of the Flairwagon are offered; LS, XS and TS, with all models available in either front- or all-wheel drive. All are powered by a 660cc DOHC engine with a continuously variable transmission (CVT), however the TS scores a turbo as well. Fuel economy ranges from 4.8 to 5.8 litres per 100km based on the Japanese JC08 mode test cycle.
Design cues on the Flairwagon include a snub-nosed front end and a boxy silhouette accented by cats-eye headlights. Typical of the class, the four-passenger vehicle also features minivan-like touches, including sliding doors and a low step-in height. Amenities include a glovebox that can be used for cold storage.
As for fuel economy, it ranges from 17.2 km/l for the TS Turbo right up to 22.2 km/l for the IS Limited VVT. Prices in Japan range from 1,212,750 Yen to 1,499,400 Yen (US$15,300-18,900).


Press Release
Mazda Launches All-New Mazda Flairwagon in Japan
- Introduction of a tall-wagon rounds out Mazdas micro-mini lineup -
HIROSHIMA, Japan-Mazda Motor Corporation today announced the addition of a new micro-mini tall wagon to its lineup. The Mazda Flairwagon goes on sale today at all Mazda, Mazda Anfini and Mazda Autozam dealerships throughout Japan.
The Flairwagon can comfortably accommodate four adults. It provides ample headroom, and the cabin length ensures that even the rear seats offer plenty of room. Sliding rear doors on both sides and a low rear step ensure passengers can easily get in and out of the car even in tight parking situations. Features of the Flairwagon have been designed for comfort and ease of use. Rear seats can be folded away with ease and an upper glove box located in front of the passenger seat can be used for cold storage.
The special edition IS Limited Flairwagon, introduced at the same time, comes equipped with an idling stop system and achieves an outstanding fuel economy of 22.2 km/L (JC08 mode test cycle).
Main features of the all-new Mazda Flairwagon
Spacious and user-friendly design and packaging
- A stylish design with a high and long roof that conveys comfort and stability.
- A high roof and long wheelbase allow a spacious 1,365mm high and 2,070 mm long cabin.
- A front bench seat and dash-mounted shifter make it easy to move between the drivers seat and the passengers seat.
- Getting in and out is easy thanks to a large rear door opening (580mm x 1,230mm) and low step (340mm - FWD model).
- The luggage compartment is only 535mm above the ground (FWD) allowing for easy loading.
- Split dive-down rear seat can be folded almost flat to create a deep cargo area capable of accommodating a standard 27-inch bicycle*1.
- Five exterior body colors are available; Aqua Veil Blue Pearl Metallic, Bloom Pink Metallic, Silky Silver Metallic, Pearl White and Bluish Black Pearl 3.
Convenient features and equipment
- The Easy Closure function employed in both sliding rear doors automatically closes the door from a half-closed position.
- Power sliding rear door on the left side can be opened and closed by remote control (All models except LS model grade).
- Advanced keyless entry and keyless push button start system allows the driver to start and stop the engine with the press of a button.
- Plenty of convenient storage space including the passenger side under-seat box and an upper glove box which functions as a cold storage space using air from the air conditioner.
Comfortable ride and outstanding environmental performance
- Achieves both powerful driving and excellent fuel economy thanks to the Variable Valve Timing (VVT) engine and a continuously variable transmission (CVT) with auxiliary gear box.
- Idling stop system with Hill Hold Control function contributes to outstanding fuel economy. (IS Limited special edition)
- All Flairwagon models qualify as super ultra-low emission vehicles (SU-LEV) with exhaust emissions at least 75 percent lower than Japans 2005 standards.

How Do I Replace the Oil in a BMW 528i
1. Warm the engine up to operating temperature so that oil will drain out completely. Park the BMW on a flat, level surface. Lift the front passenger side of the car with a floor jack, using the factory jacking point. Lower the car onto a jack stand placed under the front cross member. You can leave the jack in place for added security if you prefer. Alternatively you can drive the front of the car up onto a pair of ramps.
2. Locate the oil drain plug, which is on the oil sump and points down at an angle. Place an oil catch container under the oil drain plug. Use a 17 mm socket to loosen and remove the drain plug. Let the oil fully drain into the container. Loosen the oil cap in the engine bay to speed the process.
3. Locate the large, cylindrical container with a 36 mm nut on top. This is the oil filter housing. Unscrew the 36 mm nut with a socket and ratchet. Remove the cap and the filter as a unit. Remove the filter and then the O-ring located in the cap by gently prying it out with a screwdriver.
4. Install a new O-ring in the cap. Lightly coat the O-ring with engine oil. Install the new filter onto the cap. Make sure all the oil has drained out of the engine and then reinstall and tighten the filter and cap.
5. Wipe off the drain bolt. Remove the old crush washer from the drain bolt. Install a new crush washer on the bolt. Install the drain bolt and tighten it to 21 foot-pounds. Remove the oil cap on the valve cover and pour 7 qts. of oil into the engine. Tighten the oil cap. Start the engine and let it get up to operating temperature or drive it. Ensure there are no leaks.
Thursday, May 2, 2013
How to Replace an Alternator in an S420 Mercedes
1. Disconnect the cable running to the negative battery terminal. Loosen the nut on the cable clamp running to the negative battery terminal with a socket wrench and slide the clamp off the terminal.
2. Open the hood and look straight at the front of the engine. You will see a belt that snakes through a system of pulleys. This is the the serpentine belt, also called a drive belt. It needs to be removed in order to remove the alternator. Draw a diagram of the belt path and orientation. You will need this diagram when reinstalling the belt.
3. Remove tension on the drive belt with a socket wrench and a 14mm socket. The tensioner is on the drivers side of the engine, near the front of the engine. The tensioner bolt protrudes out of the engines pulley system at a 45 degree angle, with a little bit of a hex shape at the top of the bolt and a small hole in the middle of the bolt. Turn the bolt counterclockwise to remove tension on the belt.
4. Pull the belt off the pulley system.
5. Remove the electrical connector running to the alternator.
6. Remove the alternator. Remove the upper and lower alternator mounting bolts. The alternator is mounted on the front of the engine.
7. Install the new alternator. Installation is the reverse of removal. Make sure that you orient the drive belt properly when installing it.
8. Attempt to start the engine. As long as the battery was not drained entirely when the alternator failed, you should be able to start the engine. If the battery is dead, you may need to install a new battery. To do this, remove the cable clamps on the battery terminals following the procedure in Step 1. This time, youll be removing both the positive and negative cables. Always remove the negative cable first and attach it last. Once the cable clamps have been removed from the terminal, remove the battery from the battery holder and drop in a new battery. Then, reconnect the battery terminals and tighten the cable clamps.
9. Check to make sure that the battery light does not stay on once the Mercedes is running.
Wednesday, May 1, 2013
How to Install a Radio in a 97 Mercedes E300
1. Disconnect the negative terminal of the car battery using an adjustable wrench.
2. Insert the Mercedes removal keys in the slots on the left- and right-hand sides of the radio. Push the keys in the slots until they click into place. Pull on the keys and drag the radio unit out of the dashboard housing. Disconnect the wire harness from the rear of the radio by pushing the tab on the edge and pulling the connection apart. Pull out the radio antenna cable. Place the old stereo to one side.
3. Connect the new stereo. Attach the wire harness from the new stereo to the wire harness adapter. Push the connections together until they click into place. Repeat this process attaching the other end of the wire harness adapter to the wire harness from the Mercedes E300. Plug the radio antenna cable into the radio antenna port on the rear of the new stereo.
4. Slide the connected radio into the dashboard housing, taking care not to trap any of the wires. Push the radio into the housing as far as it will go. Reconnect the negative terminal to the car battery. Turn on the new stereo to test the installation.
Tuesday, April 30, 2013
How to Remove Climate Control in a Mercedes 300CE
1. Open the trunk of the 300CE and disconnect the battery with a socket wrench. Remove only the negative terminal.
2. Open the drivers-side door and insert the removal key into the four holes around the climate control unit, making sure the flat side is facing outward when inserting the key. Twist the key to unlock each locking tab.
3. Pull the climate control unit out of the vehicle and disconnect its wiring harness at the rear of the unit. Installation is the reverse of removal.
4. Reconnect the negative battery terminal and close the trunk.
Monday, April 29, 2013
Jeep Gladiator pick up will be born in 2015

A Jeep; a pick-up
Overall in the United States, the pick-up model is the strongest on the market. But increasingly, they are more present in other markets, both in European and Asian. After observing all the brand new prototype, Jeep made public its intention to build a new Jeep, according to a statement by Mike Manley, president of the home of the stars and stripes.
According to the High Council of the American manufacturer, is preparing for some time the possibility of launching a variant of the pick-up based on the mechanics of the "small" house, the Wrangler. Actually this is nothing new...
In addition, Jeep vehicles are perfect for work, as the Compass. Although in recent times, we had the Jeep Gladiator, which you can see on the cover photo in the Detroit Auto Show this year. And is not that a variant of the back of the body of the Jeep Wrangler.
Unfortunately, the economic situation affecting the U.S. auto industry in general, and Chrysler, in particular, has not allowed more investment determinant. Speaking of Manley, no single reading made it clear the new vehicle on the future plans of the brand, told us something of an approximate date of when it might appear at dealerships.
Two ports in 2015 and known mechanical
it could be for 2015 or later than 2016, and could even use the same mechanics of the new generation of Wrangler, incorporated in the new Mountain.
The 2015 Jeep Gladiator, so would a two ports, which would be perfect for lovers of excellent off-road without excessive weight. The future it is possible that the Jeep pick-up can be started with two doors.
However, these two vehicles would be different: one, shorter and more suitable for use in a very difficult, and the other longer and therefore somewhat difficult to handle, and better interior space for passengers.
Moreover, since the official version could incorporate a conversion kit called JK-8, manufactured by Mopar at a price of almost 4,000 euros, which can transform a simple Wrangler in a van with two doors. The Jeep Gladiator 2015, in the pick-up version. We leave you with the previous version, both in photos and on video. Find out...
How do I Change the Front Side Marker Lamp in a Mercedes C230 Compressor
1. Open the hood of the vehicle. Locate the sidelamp light assembly latch between the sidelamp assembly and the main headlight compartment. It is located halfway down from the top of the assembly. Depress the latch and lift the sidelamp light assembly out to the front of the vehicle.
2. Twist the bulb socket located on the back of the sidelamp light assembly in a counterclockwise direction and gently pull it out of the assembly.
3. Remove the side marker bulb by pushing it into the socket and turning it counterclockwise. Insert the new bulb by pushing it into the socket and twisting it clockwise.
4. Place the bulb socket back into the assembly. Reinstall the lamp assembly by sliding the guides located at the top and bottom of the assembly near the front headlamp into the tabs. Make sure it is secured and sealed before closing the hood.
How to Get Better Mileage in a BMW X5 4 4
1. Use cruise control to set your cars speed, with a maximum of approximately 65 miles per hour. Gas mileage typically decreases the faster you drive.
2. Reduce any excess weight that you might have in your car. According to the U.S. Department of Energy, the miles per gallon fuel consumption of your car decreases by 2 percent for every extra 100 pounds in the vehicle.
3. Keep your engine properly tuned. Change your spark plugs and fuel filter every 30,000 miles, in addition to changing your X5s oil at 3,000- to 5,000-mile intervals. A dirty fuel filter and bad spark plugs can cause the engine to misfire and burn more fuel than necessary. Additionally, regularly clean your air filter to ensure that the engines recommended air-to-fuel ratio is retained.
4. Make sure your tires are properly inflated, according to the inflation specifications printed on the rear door sills of your X5. The inflation specs can vary depending on the laden weight of your vehicle.
How to Unlock the Glove Box in a BMW
BMW X5, X6
1. Locate the glove compartment button. This button is not labeled, but you can find it on the dashboard center stack, parallel to the bottom of the glove compartment, just above the stereo.
2. Press the button to open the glove compartment. The two covers will fold out of the way to reveal the compartment, the inside of which will now be illuminated.
3. Close the compartment by pressing one of the covers closed.
Other BMW Models
4. Locate the handle and lock cylinder at the center of the glove compartment.
5. Release the integrated key from your remote by pressing the top button and pulling the key out with your fingers. On some models, such as the X3, the remote functions are part of the key itself. In this case, just make sure you have the "master key" with the remote functions, rather than the plain spare key.
6. Insert the key into the lock and turn it to unlock the glove compartment. Close and lock the glove box as you normally would.
How to Change the Backup Light Bulb in the BMW M3
1. Turn the engine of the M3 off and open the trunk. Put on a pair of clean gloves.
2. Use a Phillips head screwdriver to loosen the clip at the center of the trunk lid.
3. Fold the trim panel downward and pull the bulb socket down to disengage it form the electrical connector.
4. Rotate the bulb to the left and remove it from the bulb socket. Install a replacement bulb into the socket and rotate it to the right to secure it. Reattach the socket to the trunk lid. Once you hear a click, the bulb is secured.
5. Reattach the trim and the clip. Close the trunk lid.
How to Install an Audio in an Audi S4
1. Push Audi stereo removal keys into the slots on the side on the radio. The keys can be purchased from an Audi dealer or a car audio retailer. Push the keys in until they click into place. Using the keys, pull the radio out of the housing in the dashboard. Unplug the black radio antenna cable. Disconnect the radio wire harness by pushing the tab on the side and pulling the connections apart.
2. Install the face plate adapter. Audi S4s come with a double DIN-sized radio, and a basic aftermarket stereo is too small for the vacated space. A face plate adapter for the Audi can solve this problem and is available from car audio retailers. Click the face plate adapter into the slots vacated by the factory-issue stereo.
3. Attach the wiring. Connect the wire harness adapter to the wire harness of the car. Push the connections together until they click into place. Connect the other end of the wire harness adapter to the aftermarket stereo wire harness. Plug the black radio antenna cable into the radio antenna port on the rear of the aftermarket stereo.
4. Slide the aftermarket stereo into the port of the face plate adapter. Slide it is as far as it can go, taking care not to trap any of the wires. Turn on the unit to test the installation.
Subscribe to:
Posts (Atom)